To begin the process you'll need a ruler, pencil and scissors.
[After reading this, if you have any questions please contact me at the email address in the body of this blog.]
 | |
| Begin by cutting off the excess backing. I'm measuring and marking 2" out on each side. |
 |
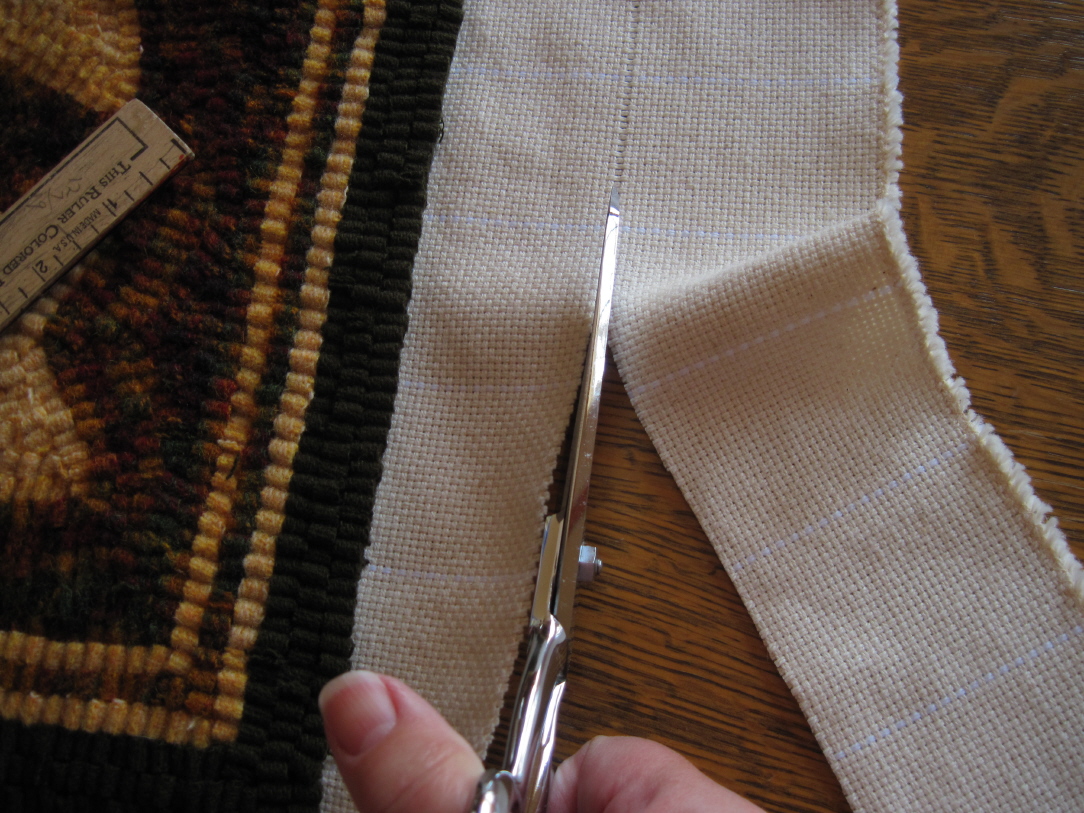
| From that point you've marked, mark with your pencil, staying in the same groove of the backing, all the way to the edge. |
 |
| With your scissors, make a clip on that line as shown. |
 |
| Find a thread at this "clip" and gently pull it out completely. |
 |
| As you can see, you've made a nice straight cutting line. |
 |
| Cut away excess on the line you just created. Do this on all four sides of your hooked piece. If you are binding a round or curved hooked piece, you will have to make marks very close together around the perimeter of your piece and cut on that marked line. |
 |
| Cut off each corner at an angle, leaving about 1" out from each corner. This doesn't have to be perfect; it's all going to be hidden under the binding eventually! |
 |
| The trimming is done and it's ready to be steamed. Edges are cut off leaving 2" and each corner is trimmed. |
 |
| Supplies needed for the next phase of the process: ironing board, iron set to "dry" (steam not necessary; you're going to make the steam), a pan of water or be near a water source, a thin tea towel as a pressing cloth, some long pins. |
 |
| Place your piece on the ironing board right side up. [Just let me add that here I'm using my small portable ironing board for this project. If I were doing a larger piece I'd use my regular ironing board. You can steam a really big rug on an ironing board; just keep working it across as you would a large piece of fabric.] |
 |
| Wring out your pressing cloth, but not too dry; leave plenty of moisture in the cloth. Begin in one corner and work your way over the entire piece. Hold the iron in one spot for about 5 seconds. DO NOT IRON -- PRESS. In other words, don't glide the iron back and forth -- press down only, leaving the iron in one spot. You don't have to bear down, just press down firmly. |
 |
| Here it is, all pressed on the right side. Looking good!!! When you're done admiring it, turn it over and we'll proceed. (LOL!) |
 |
| When you've turned the piece over to the back side, fold in each corner as shown. |
 |
| Gently press these corners as shown. Do all four corners. |
 |
| Here are all four corners informally pressed in. |
 |
| Begin pressing in the hem, turning it in to almost meet the hooked edge of your piece. |
 |
| Okay ... you have the first "turn" of your hem done. Here's what it should look like. |
 |
| Now get that pressing cloth wet again. Press the back, being careful to just press the body of the hooking and not press out the first hem you just worked so hard turning in. Press using the same technique you used on the front. If there is a place where your hooking wants to cup, or just does not lay flat, press that area again. This often happens to round areas, i.e., an apple or a circle in your pattern. |
 |
| Begin turning the hem under, catching it gently with your long straight pins as shown. Do not dig deep through to the front of your rug! Just enough to catch it to hold the hem down. |
 |
| Now you have it pinned down all around. Press ever so gently all around as shown; just with the iron and not the pressing cloth. |
 | |
| Flip your piece back over. Hey, now you can really see what it's going to look like finished! Let it dry for at least 24 hours before you proceed. IT SHOULD LAY FLAT. Here's it's shown laying on the ironing board. That would be okay if you can do it. If not, or if you're working on a large piece, put down a terry cloth towel(s) and let it lay on the towel to dry. ALSO ... while it's still damp is the time to correct any proportion problems; now is the time to tug a whopper-jawed rug back into shape! Square that rug up now! Some other pointers: don't lay your damp rug on a hardwood or laminate floor, or your nice hardwood table to dry! I don't need to explain that one, right? Relax for awhile and we'll finish tomorrow ...... Also, I always wash my binding tape before I use it. Some black tapes bleed dye and you don't want that happening in the future. I measure what tape I need to go around the edge (remember, measure twice, cut once) and add some for shrinkage. I just swish it around in my bathroom sink with some shampoo, let it soak for awhile, rinse and let it dry over the towel bar. It'll be ready tomorrow when we need it. |
OKAY ... it's been 24 hours and your rug feels dry. Let's finish it now.
 |
| Supplies needed to complete the project: sturdy needle, scissors, my preshrunk binding tape (see note above), and upholstery thread. (I use Coats upholstery thread, purple label.) |
 | ||||||
| Okay, now you're ready to hem the rug. You're tacking the hem down lightly to the back of the hooking. If you look to the right of my hand you'll see the black stitching. I don't worry about what it looks like because you'll never see it; it's covered by the binding tape! I just whip-stitch every half-inch or so. I'm approaching the corner | .. |
 |
| Now we're doing the corners. Just loosely whip this miter together, very informally. The only time I get even semi-fussy is near the very tip of the corner. Keep flipping it over to look at the right side; you don't want to pull this tight as you whip it together or you'll get gaps between the hooking on the front. So look at the right side often. Well, below is what a "finished" corner looks like at this point ... |
 |
| See, it's not fancy and it's not pulled tightly together. Like I keep saying, it doesn't have to be perfect because it will be covered by binding tape. Now, continue till you've finished whipping down the hem. |
 |
| Okay, this little mat has it's hem all whipped down. You know, in the olden days sometimes this is where they stopped. I'll bet you've seen some old rugs in antiques stores "finished" like this ... Time to begin the most tedious part (to me), attaching the binding tape. |
 |
| Using very small stitches (and what I call back stitching) attach the binding tape to the edge of the hooked piece. I begin with the tape flat and in about the middle of one side. Push the hooking away from you and get that tape as close as you can to the edge of the hooking! You don't want any backing to show between the edge of the tape and the edge of your hooking. |
 |
| When you get to a corner, work slowly and carefully, pushing the hooking back and making very small stitches as you work your way around the corner. |
 |
| Okay! You've worked all the way around, back to the beginning. Fold the end of the tape over about an inch and try to make as little bulk as possible in one spot. You'll see what I mean as you do this. Carefully whip this last couple inches down, working out as much of the bulk as you can with tight stitches. The hard part is over! |
 |
| Here is the end of the tape whipped at the edge. |
 |
| Now it's time to finish your hooked piece. Lightly pin down the hem, mitering the corners as shown. |
 |
| Here it is shown all pinned and ready to complete. |
 |
| Tack down the binding tape, making nice neat stitches of your choice. This is the part that will show if someone looks at the wrong side of your piece (like the judge at the open class fair in your county maybe?). When you get to the mitered corners, you can tack them closed if desired but it's not required. When you're doing this step, do not pull the binding tape tight; that will make the last row of hooking on the front side "grin" and show the backing. So relax, don't be uptight about this step. That is why I almost always use black binding tape; if it is very relaxed and shows on the front side, black dies (you just don't see it!). |
 |
| TA DA! Shown from the back side. |
 |
| DOUBLE TA DA! Finished! Shown from the right side. Some last words ... you may decide now to press it again, especially the back around the edge. Also, if you see any humped up places, you should press again in the problem areas. Store your rugs by rolling them up RIGHT SIDE OUT. They just don't like to be rolled up with the right side in. If you try it on this little mat it will unroll itself! Go ahead, I dare you, try it! Seriously, it stresses your rug to roll it up that way or to fold it (worse!). Also, don't store in a plastic bag or container. And, while you're still hooking it, don't leave it on a hoop or frame or it will stretch unnaturally. Hmmmm ... I think that's all. But if I've forgotten anything give me a holler! |
8 comments:
Very Nice! :)
Very helpful and great illustrations of steps :) Thanks so much for sharing!
Rachael
Have you ever used strips of wool instead of the binding tape?
Thank you so much for taking the time to explain this process. It has helped me very much.
Do you know of anyone who does this as a paid service? While I love to hook the rugs, I don't like to bind them!
Your post that documents EXACTLY how to finish a wool hooked (primitive) piece is priceless to me!! I had one row left to hook in my one and only small 7" x 9" piece- Little Sheep. That was nearly 20 yrs ago!! There were no binding directions, so I stopped. I'm going ahead today. THANK YOU!
I loved your step by step instructions to bind a hooked rug! I've bound a few but have so many sitting (rolled up, right side out, lol) waiting to be bound because I'd just forgotten how to do it. Thank you for this very precise tutorial!
Very good instructions. You might want to mention to be sure and wash the tape before hand. It shrinks quite a bit. I have washed a few of my rugs, but was lucky to have pre washed the tape. I have also used wool strips in place of the tape. This works well for a wall hanging.
Post a Comment